Showing posts with label tame the paper monster. Show all posts

Thursday, July 11, 2013

{Throwback Thursday}

Since I'm still pretty new to the blogging world I've really enjoyed seeing all the posts from Throwback Thursday over at The First Grade Parade


I've noticed one of the first posts I ever wrote has been getting some more views lately and I wanted to share it for some of my new followers. 

Here is an explanation of how I have students turn in papers and also how I keep makeup work for absent students. 

If you are interested in reading more of the Tame the Paper Monster Series you can catch up on them here, here, and here.
______________________________________________________

Tame the Paper Monster Series 

Part 1 Student Papers


I have been battling with the paper monster since my teaching career began 7 years ago. I feel like I've tried every solution out there to dealing with the mounds and mounds of paper that seem to magically appear in the classroom.

I'll save you the recap of all the systems that came oh so close but never quite made the cut. I'm an organization lover (okay, I might have just a slight obsession with it) so having all these homeless papers floating around the room really bugged me.  Now after all my scouring teacher magazines and office supply stores I have hit upon the perfect solution (at least it is in my little world)! 

I give each student a number at the beginning of the year and we use it to label papers, books, mailboxes etc.  Well those little numbers come in super handy, so first things first - give all your little darlings a number. 

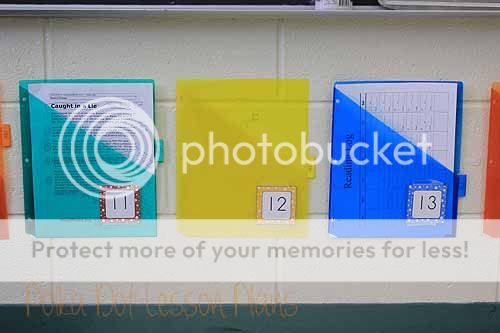
I went to Wal-Mart and picked up packages of slash pocket dividers for 3 ring binders and attached a number (from an old calendar set) to the front.  I used one little Command poster strip and stuck those babies to the wall under my chalkboard.  I also have a deep love for Command strips.  What can't those things hold up? These have been up in my classroom since before Christmas and are still holding strong on our cinder block walls. 


Now when students come into the classroom they have a place to put homework right away.  There are no baskets, check lists, folders or other fancy systems - just these little pockets.  Students place their work in the pocket with their number on it and ta da! - papers managed! 

Here are some reasons why I love these pockets: 
  •  In one glance I can see who didn't have homework to turn in. 
  •  When I pull work out of the pockets it is already in alphabetical order. 
  • When its time to put work into mailboxes the papers are already in order.
  • They are using up that dead space under my chalkboard. 
  • When I have a student absent for the day I stick whatever work they've missed in the pocket. When the office calls for Johnny's make up work to be ready at 3:00 and it's 2:58 I can swoop in like Super Teacher and have it all together! 
  • We have a rule - nothing goes into your pocket until you pick up make up work. 
  • No name? No Problem!  I can use my class list to see whose paper is missing the name. 
I do have a few thoughts about why this has been so effective for me and my students.  First of all the pockets are right under the chalkboard and easily visible to everyone.  I've tried them in the back of the room and students seem to ignore them back there and make up work stays there forever! 

They are clear, durable, and easy to use.  I've tried using file folders this same way (just staple the edges together), but it is more difficult to get papers into the file folder and they don't hold as much.  These little plastic sleeves of goodness (told ya I loved 'em) hold A LOT of work and it all looks neat - nothing is flopping out of the side of the pocket. 
Stick around for part two of the series when I'll reveal where papers go after they leave the pocket. 

Wednesday, April 3, 2013

Tame the Paper Monster Part 5: Student Files


In this last and final installment of my Tame the Paper Monster series we will tackle the student files. 
I don't know about you, but in my school we are required to keep a file for each child. In those files we keep notes, excuses, tardy slips, and a few signed forms from the beginning of the year. 
After a couple years of writing on labels and sticking them over the names of last year's students I decided there had to be a better way. I went in search of a solution (on proteacher.net) and found one of the best organizing ideas I've used in my classroom. Now, I don't have any record of whose idea this was, so if it belong to you I want to know so I can tell you how smart you are!
The lovely person on the message board suggested buying one of these: 
This one is around $12 on Amazon. You can click on the picture to go to the product site on Amazon.

I purchased mine at WalMart and cut the top off just so I could have easier access. Then I labeled each tab 1-21 and printed a little numbered class list and taped it onto the front of the folder. Each student's information is placed in the file that matches their number - easy peasy! 

Now, I keep this instead of an individual file for each student because this method saves a lot of time and folders! At the beginning of each year I purge my files and tape on a new class list for a fresh start. I've been using this same folder for at least 5 years and it is still going strong. 


This probably wouldn't work for you if you are required to keep folders that must be handed down at the end of the year, but maybe you could think of some other way to use this handy time saver in your room? 

Wednesday, March 27, 2013

Tame the Paper Monster Part 4: Papers for Students

The organization frenzy continues! Today I'm going to show you what I do with the papers I need to give my students and/or use in lessons. 
If you are just joining in on the series you can get your organization on here: part 1, part 2, and part 3.

There are two parts to this system: a 3-drawer box and a hanging file organizer. 


We'll start out with the 3-drawer box. This is where I store papers until I'm ready to use them with my students. As soon as I copy something I put it in the corresponding subject drawer. I used my Silhouette Cameo and some vinyl to create some fun labels for each of the drawers. 


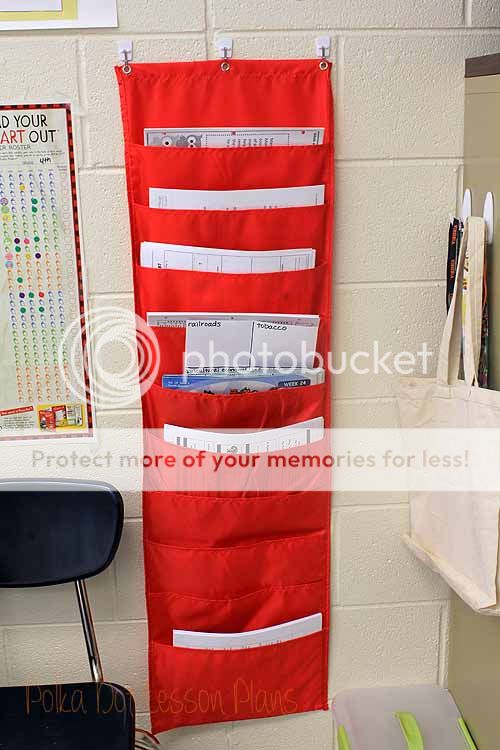
The other part of the system involves this hanging file folder chart. 


Every afternoon before I leave school I open my lesson plans and check to see what papers I'll need for the next day's lessons. I pull them out of the 3-drawer box and put them in the pockets in the order I'll use them (nerdy I know, but that's just how I roll). 

This chart is really sturdy and can hold a lot of papers. You can see in this picture it even has room for our Studies Weekly newspapers. I also use it to keep foldable examples and lesson pages I might need throughout the day. Just like last week, the whole goal here is to keep the papers off my desk! 

It keeps all my papers out of the way and helps me to stay on track with what we will be doing next. 

What paper "tricks" do you use in your classroom? 

Tuesday, March 19, 2013

Tame the Paper Monster: Part 3 Clearing Your Desk

This was a hard post to think of a title for....the best thing I could say to describe this post? What to do with all the papers you want off your desk but don't have time to deal with right now! 

Enter more baskets from Really Good Stuff. You didn't really think I was finished with using baskets did you? 

This is a shot of the book case located right behind my desk. 


Now let me take you on an in depth tour of the mysteries and magic these three baskets hold....hehe

First up we have the graded papers basket. 


As soon as I grade a set of papers they go straight into this basket. Then when I have the time (and sanity) to put them into our online system I have them all handy. 

Next up we've got the "to file" basket.


This is where all my originals go after I make copies. Anything I plan on filing for later use I just stick in this basket. {Confession: I cleaned out the basket before I took the pictures, but it was full!}  

This method is just the easiest way for me to keep up on separating worksheets, plans, foldables, and ideas into separate files in a filing cabinet. On most days I have no time to spare for filing. I can just throw stuff in this basket and then set aside 30 minutes one day and get it all sorted out and in its proper place. 

The last basket on this shelf is a new idea I've tried this year. This basket is for upcoming lessons. 


I've been using this basket to hold lessons and ideas for units that I know are coming up in the next couple weeks. This one holds printables, foldables, leveled readers, read alouds, and anything else I'd like to use soon. Its a great way to keep all that material together and still off my desk. When I start planning this is the first place I look to see what little treasures I've gathered up! 

As we love to say in the south, Bless Your Heart for reading this post full of pictures of nothing but baskets! In the next installment of the series we'll be using something slightly more exciting than a basket....but when you are an organization nerd lover what could be more exciting than a basket? 

Tuesday, March 12, 2013

Tame the Paper Monster Part 2: The Inbox

The Inbox

When we last left off our paper journey through my classroom students had placed papers in their pockets. If you missed this leg of the journey you can catch up here

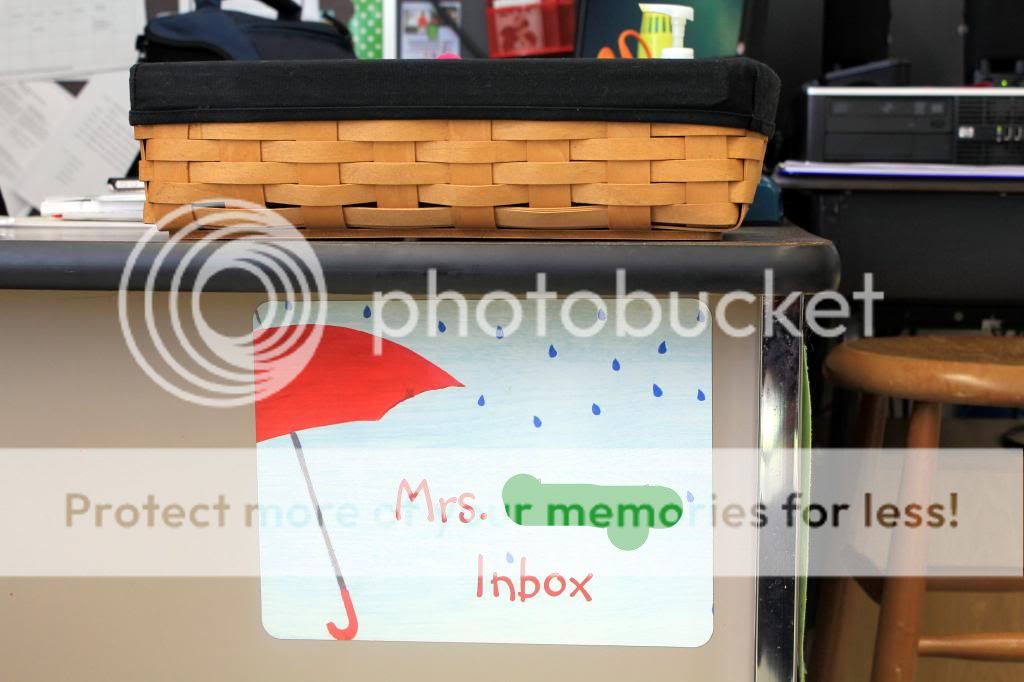
The next step of the journey is oh so simple. When I collect papers they go into my Inbox. I recently saw some nice, paper-sized bins at Wal-Mart that would be perfect for this.

Side Note: That magnet was a Vista Print freebie from a couple summers ago - gotta love those!

 The inbox sits on the corner of my desk and is the catch all for things in my classroom. From the first day of school I tell students that is the only place they are allowed to put things on my desk. This really cuts down on 1) clutter on my desk and 2) losing something in all the stuff that ends up on my desk. (My goal is to empty the papers in my inbox by the end of the day.)

So, collect papers and put them in the basket simple enough. Until the day when I think I'm going to drown in all the papers and I can't think straight because all I want to do is sit down and grade and sort when in reality all I can do is teach the next lesson on the Civil War. What happens then?  These are days when the inbox has the potential to run over into the garbage can that sits right under it, but we can't let that happen! My organized self has a plan for those days too. 

Enter the Really Good Stuff baskets!


On days when I can't get the papers graded and I can't get even see the bottom of my inbox (and if you know me you know that's a bad day for me!) I use these baskets as backup. These baskets are proof that I have an organizational problem. When your basket has a backup you probably have more problems than a few too many papers to grade, but anyway I did warn you.  

I just sort the papers out according to subjects and I can grade them when I get a chance. This is the outta sight, outta mind method. LOL  

These baskets were actually my paper collecting method of choice until I discovered the pockets, but I've kept them around because they do still come in handy from time to time. I really like asking a substitute to leave papers in the baskets so coming back to school after a day out isn't so overwhelming. 

One last thing, did you know Really Good Stuff offers a payment  plan of sorts? Yup, they sure do! You can pay for your purchase over 3 months. When I learned that juicy little tidbit I bought a lot of baskets! Happy Day! 

Be sure to follow along next time when we'll discuss how I keep track of all my "teacher" papers.

Wednesday, March 6, 2013

Tame the Paper Moster: Part 1 Student Papers

Tame the Paper Monster Series 

Part 1 Student Papers


I have been battling with the paper monster since my teaching career began 7 years ago. I feel like I've tried every solution out there to dealing with the mounds and mounds of paper that seem to magically appear in the classroom.

I'll save you the recap of all the systems that came oh so close but never quite made the cut. I'm an organization lover (okay, I might have just a slight obsession with it) so having all these homeless papers floating around the room really bugged me.  Now after all my scouring teacher magazines and office supply stores I have hit upon the perfect solution (at least it is in my little world)! 

I give each student a number at the beginning of the year and we use it to label papers, books, mailboxes etc.  Well those little numbers come in super handy, so first things first - give all your little darlings a number. 

I went to Wal-Mart and picked up packages of slash pocket dividers for 3 ring binders and attached a number (from an old calendar set) to the front.  I used one little Command poster strip and stuck those babies to the wall under my chalkboard.  I also have a deep love for Command strips.  What can't those things hold up? These have been up in my classroom since before Christmas and are still holding strong on our cinder block walls. 


Now when students come into the classroom they have a place to put homework right away.  There are no baskets, check lists, folders or other fancy systems - just these little pockets.  Students place their work in the pocket with their number on it and ta da! - papers managed! 

Here are some reasons why I love these pockets: 
  •  In one glance I can see who didn't have homework to turn in. 
  •  When I pull work out of the pockets it is already in alphabetical order. 
  • When its time to put work into mailboxes the papers are already in order.
  • They are using up that dead space under my chalkboard. 
  • When I have a student absent for the day I stick whatever work they've missed in the pocket. When the office calls for Johnny's make up work to be ready at 3:00 and it's 2:58 I can swoop in like Super Teacher and have it all together! 
  • We have a rule - nothing goes into your pocket until you pick up make up work. 
  • No name? No Problem!  I can use my class list to see whose paper is missing the name. 
I do have a few thoughts about why this has been so effective for me and my students.  First of all the pockets are right under the chalkboard and easily visible to everyone.  I've tried them in the back of the room and students seem to ignore them back there and make up work stays there forever! 

They are clear, durable, and easy to use.  I've tried using file folders this same way (just staple the edges together), but it is more difficult to get papers into the file folder and they don't hold as much.  These little plastic sleeves of goodness (told ya I loved 'em) hold A LOT of work and it all looks neat - nothing is flopping out of the side of the pocket. 
Stick around for part two of the series when I'll reveal where papers go after they leave the pocket. 


Related Posts Plugin for WordPress, Blogger...