Sunday, March 31, 2013

Anticipating the Month Ahead {April}

I'm excited to be joining up with Jessica at Literacy Sparks for her first linky party! I'm always looking ahead and planning..what teacher isn't really? 


Here are the rules: 

  • Share one thing you are looking forward to during the month of April.
  • Share one thing you are dreading during the month of April.
  • Share one thing that you hope to accomplish during the month of April.

And here is what I'm anticipating for the month of April...

Looking forward to Spring Break this week! A really nice way to start the month. 

Dreading the start of "testing season". 

Hoping to accomplish successful small group and station review session for both Social Studies and reading. 

Friday, March 29, 2013

Five for Friday

I'm joining up with Doodle Bugs Teaching for another Five for Friday linky party.


1. The work week started out with 2 snow days! I took advantage of the time to get a game plan for reviewing after we get back from Spring Break. I also spent some a lot of time cuddling with this cutie. Snow days are exhausting for him.....


2. I am officially on Spring Break!!! Even though we had two snow days this week there is just something so different (and wonderful) about knowing that I don't have school for 5 whole days! I have dreams of cleaning, reading, catching up with friends, and a fun weekend with my hubby. 

3. We made it through the last set of parent conferences for the year!


4. I am so looking forward to this Easter weekend. After celebrating the resurrection of my Savior at Church on Sunday morning we are going to have the family over for a food fest and egg hunt, if the weather will cooperate. 


5. After two snow days and two days of benchmark testing, we were finally back to a somewhat normal schedule. Before the kids came in this morning I hid 40 eggs around the room. I was giddy...it was so much fun just hiding the eggs! We got Friday started right with this super fun activity from Collaboration Cuties. You can check it out here. I had each kid find two eggs, read the words inside and then drop them into the correct basket. We then went through the eggs as a class and checked/discussed. My kiddos were great and we all had such a good time! Even thought Easter will be well behind us when we return from Spring Break I plan on using this activity in a center because the kids loved it!

~Courtney

Wednesday, March 27, 2013

Tame the Paper Monster Part 4: Papers for Students

The organization frenzy continues! Today I'm going to show you what I do with the papers I need to give my students and/or use in lessons. 
If you are just joining in on the series you can get your organization on here: part 1, part 2, and part 3.

There are two parts to this system: a 3-drawer box and a hanging file organizer. 


We'll start out with the 3-drawer box. This is where I store papers until I'm ready to use them with my students. As soon as I copy something I put it in the corresponding subject drawer. I used my Silhouette Cameo and some vinyl to create some fun labels for each of the drawers. 


The other part of the system involves this hanging file folder chart. 


Every afternoon before I leave school I open my lesson plans and check to see what papers I'll need for the next day's lessons. I pull them out of the 3-drawer box and put them in the pockets in the order I'll use them (nerdy I know, but that's just how I roll). 

This chart is really sturdy and can hold a lot of papers. You can see in this picture it even has room for our Studies Weekly newspapers. I also use it to keep foldable examples and lesson pages I might need throughout the day. Just like last week, the whole goal here is to keep the papers off my desk! 

It keeps all my papers out of the way and helps me to stay on track with what we will be doing next. 

What paper "tricks" do you use in your classroom? 

Tuesday, March 26, 2013

Tried it Tuesday {Research Reports}


I'm linking up with Fourth Grade Flipper for Tried it Tuesday. I'm loving the idea of this linky party and can't wait to read what everyone else is trying. 


Photobucket

This past week I began working on research projects with my 4th graders. This is usually a subject that causes me to run in the other direction, but I have tried something that has changed my mind. Back during the Super Bowl Sale on TpT I bought something called Take the Madness out of Research Projects, created by Dragon's Den. You've got to click over and check this out - its such a neat idea! 

As soon as we launched these projects I had students asking when we were going to work on them again and even if they could take them home and work on them! Yes, you heard right, I had students begging me to take them home so they could do MORE research at home. 

One thing that I think really helped add an element of excitement to our projects was the people we were researching. In 4th grade social studies we learn about Virginia History and there are 6 important people from the 20th century we study about, but most of my students have never heard of them until now. I didn't give away any information about the people, just assigned students their person right before class ended one day and the anticipation and wonder was killing them! It was so neat to see my students speculating on what their person did and why they were so famous. 

I'd made some group statements, like one person lived near where we do, another person was a sports star, etc., so they were very anxious to see if their person had done any of those things I'd mentioned. 

Now, the bad thing about this?  I have 20 very excited, motived students (but thats good, right?) and today is our 2nd snow day for this week, we have 2 benchmark tests to give this week, a Spring party on Friday, and Spring Break next week. Time is not our friend right now. It is looking like we will most likely not be able to finish these reports before Spring Break. Don't you just hate when that happens? You finally get something good goin' on in the classroom and then it seems like every outside force works against you? LOL  


Monday, March 25, 2013

Partner Cards Review Game

We had a snow day today. At the end of March. This is crazy. However, I've had a huge to-do list to prepare for review and I was able to get started on it today. That leads me to this post about one of my most favorite review activities: Partner Cards!

When I look for review games and activities my number one requirement is that all students are engaged. I just have a difficult time keeping everyone focused on the review if we have to wait for people to take turns and think of answers, etc.. 

The partner cards review game has been a go-to for me since I started teaching. Everyone is involved in review throughout the entire process and they get to talk...what 4th grader doesn't love to talk? It also gives the students a way to self-check so you are ensuring your precious time is spent reviewing the correct material! 

Here is a picture of what the template looks like. You can click the picture and download it to customize the cards with your questions.


Begin with a list of 20 questions you'd like students to review. Type the first 10 questions in the "A Questions" section and then fill in the answers to those questions in the corresponding numbered boxes under "A Answers". Do the same thing with the last 10 questions. 

Make some copies, cut them apart, and pair up your students. The kiddo with the "A Answers" paper goes first. He chooses a random question from the card and asks his partner. The partner is looking at the "A Answers" box and can use that as a word bank for answering the question. When the partner has an answer she says, "12. orange". The partner that asked the question then checks to make sure that 12 was the question number he asked. Then the question asking role switches over to the partner with "B Questions" and continues like above. 

Basically, the question and answer have the same number and when you get a matching set of numbers you have a correct answer. If a student answers incorrectly I always tell the asker to share the correct answer. 

It is important that the student asking the questions asks them out of order and also doesn't tell the question number. 

This game goes quickly, so I always have partners switch cards after they've asked all 10 questions on their own card. You can also make the game more challenging by folding back the answer box to hide it and just answering from memory instead of looking at the answer choices. 

I hope those directions were clear. When I reread them it sounds all complicated and trust me it is not. Make some cards, hold a family member hostage recruit a family member, and give this a try to see for yourself. 

What are some of your favorite review games?

Saturday, March 23, 2013

Success with Fun Friday!

Homework. The word causes me to cringe. Not because I don't want to give it or I think its bad, but because I hate dealing with the students that never turn it in. I don't load my students down with homework, but I do expect them to complete what work has been assigned.

The problem seemed to be even bigger this year than in the past. A few weeks into school my principal suggested we use a 3 strikes and you're out system for homework. Very simple: no homework = strike and 3 strikes = a trip to the office. It was effective, but still there were those students who were getting one strike or even two a week and there still were no "real" consequences for their actions. 


Then I ran across Laura Candler's post about Fun Friday. It was a game changer for me. Click on over to read all about how to set it up (there are some freebies too)!

The idea is so simple, she does such a great job explaining how it works, and it fit right in with the strike system we already had in place. 

Our Fun Friday policy is one strike and you're out. Harsh I know and I've cringed many times when I marked down a strike for a student who has homework most of the time, but I've been very strict about this policy. 


It has been A-M-A-Z-I-N-G!!! I can't say enough good things about this idea. Since we have started Fun Friday the incidents of missing and incomplete homework have dropped significantly. 


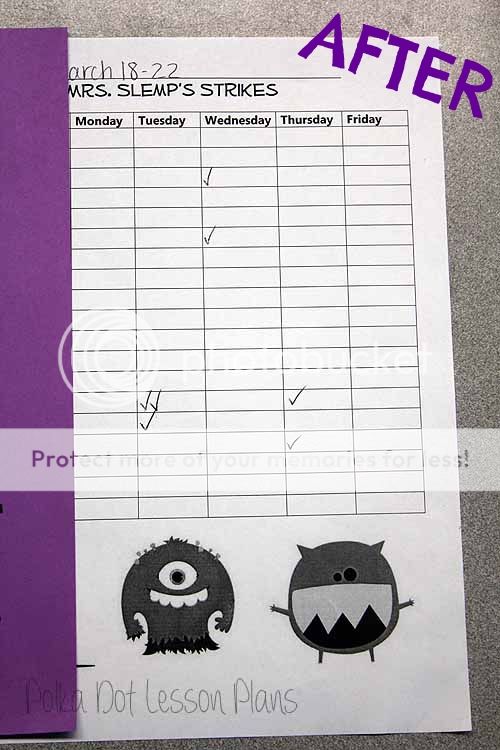
Here is the before and after of my strike sheets. 


Yes I still have strikes and mostly likely there will always be a few strikes on my list, but look at what a different there is! 

I've found that my habitual offenders have really been impacted the most by this idea. One student in particular hardly ever turned in spelling homework, now he has it on time every week! 

It has also made a big impression on those students who miss turning in one or two assignments a week, but weren't at the 3 strike mark. 

The kids are loving this idea as well. Every Friday I always get the question, "Are we going to have Fun Friday today?" Of course we have been very diligent about having it no matter what (schedule changes, delays, etc.) and it has really paid off for us. 

Just a side note - I also count signing Tuesday pockets, report cards, or important notes in my strike system. The first time I did that (in conjunction with Fun Friday) I was amazed because ALL my students returned their Tuesday pocket the next day. Before we implemented this system I was nagging students all week about turning in their pockets. 

Do you have any tricks for getting students to turn in homework on time? Have you tried Fun Friday? 

Friday, March 22, 2013

Five for Friday {Linky}

I'm linking up with Doodle Bugs Teaching for my very first Five for Friday post! 


1. I am looking forward to having some extra time this weekend to work on a few craft projects. I'm going to jazz up a few clipboards and finally make a spring wreath. 

2. I started working on creating review material for Social Studies this week. I'll be posting more details about this project a little later. 


3. I have found my new blog crush ~ Collaboration Cuties. You gotta check 'em out! They have some really unique ideas and adorable printables. I'm all set on blog reading material for the weekend.

Collaboration Cuties


4. Only one more week left until Spring Break. It will be very busy with preparing for report cards and conferences on Thursday. We are gonna finish it off with the Spring party and egg hunt on Friday.  I love breaks, but it seems like that week before I have to work double time to get everything finished!

5. Finally, Spring has arrived on our farm. This little girl was born on St. Patrick's Day and my husband was giving her a lift to her momma. Even though our weather hasn't been very Spring-like seeing things like this makes me grateful for Spring's renewal. 


Tuesday, March 19, 2013

Tame the Paper Monster: Part 3 Clearing Your Desk

This was a hard post to think of a title for....the best thing I could say to describe this post? What to do with all the papers you want off your desk but don't have time to deal with right now! 

Enter more baskets from Really Good Stuff. You didn't really think I was finished with using baskets did you? 

This is a shot of the book case located right behind my desk. 


Now let me take you on an in depth tour of the mysteries and magic these three baskets hold....hehe

First up we have the graded papers basket. 


As soon as I grade a set of papers they go straight into this basket. Then when I have the time (and sanity) to put them into our online system I have them all handy. 

Next up we've got the "to file" basket.


This is where all my originals go after I make copies. Anything I plan on filing for later use I just stick in this basket. {Confession: I cleaned out the basket before I took the pictures, but it was full!}  

This method is just the easiest way for me to keep up on separating worksheets, plans, foldables, and ideas into separate files in a filing cabinet. On most days I have no time to spare for filing. I can just throw stuff in this basket and then set aside 30 minutes one day and get it all sorted out and in its proper place. 

The last basket on this shelf is a new idea I've tried this year. This basket is for upcoming lessons. 


I've been using this basket to hold lessons and ideas for units that I know are coming up in the next couple weeks. This one holds printables, foldables, leveled readers, read alouds, and anything else I'd like to use soon. Its a great way to keep all that material together and still off my desk. When I start planning this is the first place I look to see what little treasures I've gathered up! 

As we love to say in the south, Bless Your Heart for reading this post full of pictures of nothing but baskets! In the next installment of the series we'll be using something slightly more exciting than a basket....but when you are an organization nerd lover what could be more exciting than a basket? 

Saturday, March 16, 2013

Reivew: Comprehension Skills Packets from Reading A-Z

I love to find teaching resources that are relevant, ready to use and don't require a lot of prep time. It was love at first site when I found these Comprehension Skill Packets from Reading A-Z. These are going to be perfect for review.

I know Reading A-Z is a paid site, but there are some sites that I think are well worth the investment and A-Z is one of them!

Here is a screen shot of the first page you'll see when you get to the packets so you can read a little more about what they've got to offer.


The packets cover a wide range of reading skills and are for grades 1-5. Each packet has a lesson plan, projectable passage for whole group practice, and a projectable/printable passage for independent practice. 

Here is another screen shot from the fourth grade section...just a quick view of a few of the topics available.


I recently used the Compare and Contrast Skills Packet to review with my students and I thought it was a great success. Everyone was engaged, the stories were interesting, and I felt like the suggestions in the lesson plan were useful and relevant. 

If you don't have a subscription to Reading A-Z you can click here for a link to a 7 day free trial.

In addition to the Comprehension Skills Packet, the site offers leveled readers with lesson plans, activities, and comprehension tests.  It is an excellent resource and one that I would highly recommend!

Have you tried any of the skills packets? What did you think? 


Tuesday, March 12, 2013

Tame the Paper Monster Part 2: The Inbox

The Inbox

When we last left off our paper journey through my classroom students had placed papers in their pockets. If you missed this leg of the journey you can catch up here

The next step of the journey is oh so simple. When I collect papers they go into my Inbox. I recently saw some nice, paper-sized bins at Wal-Mart that would be perfect for this.

Side Note: That magnet was a Vista Print freebie from a couple summers ago - gotta love those!

 The inbox sits on the corner of my desk and is the catch all for things in my classroom. From the first day of school I tell students that is the only place they are allowed to put things on my desk. This really cuts down on 1) clutter on my desk and 2) losing something in all the stuff that ends up on my desk. (My goal is to empty the papers in my inbox by the end of the day.)

So, collect papers and put them in the basket simple enough. Until the day when I think I'm going to drown in all the papers and I can't think straight because all I want to do is sit down and grade and sort when in reality all I can do is teach the next lesson on the Civil War. What happens then?  These are days when the inbox has the potential to run over into the garbage can that sits right under it, but we can't let that happen! My organized self has a plan for those days too. 

Enter the Really Good Stuff baskets!


On days when I can't get the papers graded and I can't get even see the bottom of my inbox (and if you know me you know that's a bad day for me!) I use these baskets as backup. These baskets are proof that I have an organizational problem. When your basket has a backup you probably have more problems than a few too many papers to grade, but anyway I did warn you.  

I just sort the papers out according to subjects and I can grade them when I get a chance. This is the outta sight, outta mind method. LOL  

These baskets were actually my paper collecting method of choice until I discovered the pockets, but I've kept them around because they do still come in handy from time to time. I really like asking a substitute to leave papers in the baskets so coming back to school after a day out isn't so overwhelming. 

One last thing, did you know Really Good Stuff offers a payment  plan of sorts? Yup, they sure do! You can pay for your purchase over 3 months. When I learned that juicy little tidbit I bought a lot of baskets! Happy Day! 

Be sure to follow along next time when we'll discuss how I keep track of all my "teacher" papers.

Saturday, March 9, 2013

Foldables as an Assessment Tool and an AMAZING Rubric Site

I had planned to create this foldable as more of a whole group project, but on a whim further thought I decided I would use it as a basic assessment tool for story elements.


My students were excited about the idea of getting to create their own foldable without me leading them through the steps. I put up some simple directions on the board, went over my expectations, handed out the supplies, and stood back to watch them work magic!

I typically use folables as more of a teaching tool, but decided to take a different approach and see where that lead us.


On the top of the inside flap I had students write the definition for the element and on the bottom they named the character/setting/problem from their book. 

I liked using foldables in this way because my kiddos came up with their own answers instead of just choosing A,B,C, or D on a test.We are approaching "testing season" and my students are bombarded with multiple choice tests so its nice to see some written responses for a change. 
 
I decided to use a rubric to assess the foldables. Confession time: I don't use rubrics as much as I think I should. They are somewhat intimidating to me and all that grading and the extra paper.....but I discovered an amazing new site that has turned my rubric thinking around.

ForAllRubrics is a seriously amazing site.Stop what you are doing now and go check it out. Plan something this week that you will use a rubric with. You will LOVE this site. What makes it different from other rubric sites? You create classes, enter your students' names, and actually score the rubrics online. It is so easy and so much fun (okay, maybe that's the novelty) that I graded these foldables at 11:00 on a Friday night. I know, be jealous of my very exciting life.

I didn't read a tutorial or anything on this site - it is that easy. Upon further exploration it looks like the site offers some very useful features for analyzing your student's performance. This site is definitely one I plan on using and exploring more in the coming weeks.

I wouldn't have learned about this amazing resource if not for an incredible blog I just started following this week: Purely Paperless. I've been downloading apps and visiting websites ever since I started reading her blog - its amazing! If you are interested in technology in the classroom you've got to check out Kate's blog HERE!


Wednesday, March 6, 2013

Tame the Paper Moster: Part 1 Student Papers

Tame the Paper Monster Series 

Part 1 Student Papers


I have been battling with the paper monster since my teaching career began 7 years ago. I feel like I've tried every solution out there to dealing with the mounds and mounds of paper that seem to magically appear in the classroom.

I'll save you the recap of all the systems that came oh so close but never quite made the cut. I'm an organization lover (okay, I might have just a slight obsession with it) so having all these homeless papers floating around the room really bugged me.  Now after all my scouring teacher magazines and office supply stores I have hit upon the perfect solution (at least it is in my little world)! 

I give each student a number at the beginning of the year and we use it to label papers, books, mailboxes etc.  Well those little numbers come in super handy, so first things first - give all your little darlings a number. 

I went to Wal-Mart and picked up packages of slash pocket dividers for 3 ring binders and attached a number (from an old calendar set) to the front.  I used one little Command poster strip and stuck those babies to the wall under my chalkboard.  I also have a deep love for Command strips.  What can't those things hold up? These have been up in my classroom since before Christmas and are still holding strong on our cinder block walls. 


Now when students come into the classroom they have a place to put homework right away.  There are no baskets, check lists, folders or other fancy systems - just these little pockets.  Students place their work in the pocket with their number on it and ta da! - papers managed! 

Here are some reasons why I love these pockets: 
  •  In one glance I can see who didn't have homework to turn in. 
  •  When I pull work out of the pockets it is already in alphabetical order. 
  • When its time to put work into mailboxes the papers are already in order.
  • They are using up that dead space under my chalkboard. 
  • When I have a student absent for the day I stick whatever work they've missed in the pocket. When the office calls for Johnny's make up work to be ready at 3:00 and it's 2:58 I can swoop in like Super Teacher and have it all together! 
  • We have a rule - nothing goes into your pocket until you pick up make up work. 
  • No name? No Problem!  I can use my class list to see whose paper is missing the name. 
I do have a few thoughts about why this has been so effective for me and my students.  First of all the pockets are right under the chalkboard and easily visible to everyone.  I've tried them in the back of the room and students seem to ignore them back there and make up work stays there forever! 

They are clear, durable, and easy to use.  I've tried using file folders this same way (just staple the edges together), but it is more difficult to get papers into the file folder and they don't hold as much.  These little plastic sleeves of goodness (told ya I loved 'em) hold A LOT of work and it all looks neat - nothing is flopping out of the side of the pocket. 
Stick around for part two of the series when I'll reveal where papers go after they leave the pocket. 


Sunday, March 3, 2013

A Novel Study: Frindle

My class just finished reading Frindle by Andrew Clements. We did a lot of really fun activities with this book, most of which could be used with any novel.


1. Prereading plot sort - I wrote the title names on slips of paper.  We previewed the book and then students worked together in groups to glue the titles in what they thought was the correct order.  We periodically checked back with these lists as we were reading to see whose guesses were closest.

2. Dictionary word look up - I don't have students copy definitions from a dictionary as part of our vocabulary studies, but I couldn't help but giving them just a little taste of Ms. Granger's medicine!  I chose 10 words from the book and my students looked them up.  After this they were certainly glad they didn't have 35 words to look up each week!

3. Fact and Opinion sort - My students wrote down 10 statements made by the main character. They then sorted the statements into facts or opinion.

4. Beginning Middle End Character Analysis - After we read the last chapter of this book students were surprised to learn that Ms. Granger had been on Nick's side all along.  This led us to a great discussion about characterization.  We divided a paper into three sections and labeled them beginning/middle/end.  We then used the folded paper for students to record what they thought of Ms. Granger at the beginning/middle/end of the book.  I was very pleased with how creative some of my students were with their word choices and "evidence".

5. Paper Plate Characters - Students chose one of the two main characters and then picked out two words that described the character.  Next, they had to give evidence to back up the claims they'd made about the character.  When that was done, students got a paper plate and piece of construction paper.  They created a shirt (or dress in some cases) from the construction paper and wrote their words and evidence on the front.  Then the paper plate was transformed into the character's head.  After students were finished we stapled the head to the shirt.  We created a bulletin board using all the characters (I took it down before I got a picture!).  They look like bobble head dolls - too cute! 


6. Scene Snap Shot - For this activity we chose to hone in on the chapter where Nick gets his "Big Idea".  Students drew what they visualized when reading the chapter, then wrote a caption for the illustration on an index card.  Then on the back of the drawing they wrote a paragraph detailing what happened before the scene and then another paragraph telling what happened after the scene.


We've had a lot of snowy weather lately which means delays and missed class time.  There were a few activities I've had to choose to push aside.  I had really wanted to create a flipbook that had character/setting/plot flaps, so maybe we'll use that for the next novel.  I am planning on having students create their own words this week during our writing time. 

What are some of your favorite activities to use with novels? 


Related Posts Plugin for WordPress, Blogger...